DIY: How to Paint or Refinish Your Guitar With Nitrocellulose
Diyer guide to paint or repaint your electric guitar with nitrocellulose: stripping, sanding, painting and polishing process of your guitar, DIY kit or your partcaster.
Table of Contents
How to paint or refinish your guitar
Puede que ames tu guitarra pero te gustaría que fuese de otro color, puede pasar que su acabado esté deteriorado y quieras darle una nueva imagen; también que quieras mejorar el acabado, cambiar un acabado grueso de poliuretano o poliéster por uno más fino de nitrocelulosa; o simplemente estás con un proyecto DIY armando un KIT o una partcaster. Sea lo que sea, esta guía DIY te enseñará como hacer un acabado nuevo para tu guitarra o proyecto DIY.
Las claves de un buen acabado de guitarra: paciencia y tiempo
Repintar o pintar una guitarra no es difícil, incluso para un principiante, sólo requiere de paciencia y tiempo. Debes trabajar duro para preparar adecuadamente la madera de la guitarra, y cumplir los tiempos de curado adecuados de la laca. Los acabados con nitrocelulosa requieren semanas.
Tipos de acabados de guitarra
Nitrocellulose / Nitrocellulose Lacquer
There are several types of finish that are used for guitars. Traditional nitrocellulose finishes are found on many high-end instruments. Gibson and Martin instruments and Fender high-end instruments use nitrocellulose lacquer for their finish. They are characterized by looking better than the rest, less “plastic” than polyester and polyurethane.

Polyurethane / Polyurethane Lacquer
Another very common type of finish is polyurethane, which is harder and easier to work with, which is why it is used in most mass-produced guitars. This is used by most of the Fender, Ibanez, Squier, and Epiphone models, just to name a few.
Other types of finishes: Polyester, oils and waxes
Also, in cheaper guitars, polyester paint is used, a derivative of polyurethane. Its quick drying makes work easier, faster and cheaper.
The oil or wax finish is one of the oldest methods of guitar protection. Although this type of finish does not protect your musical instrument from blows, it is the favorite of many musicians for its natural and fast touch.
Lastly, some manufacturers are now also using eco-friendly water-based finishes that are safer to handle.
Change of polyurethane or polyester finish for one of nitrocellulose
For this DIY guide, we’ll show you how to remove a polyurethane or polyester finish, prepare the guitar for painting, and paint the guitar with nitrocellulose lacquer, using spray cans. Thus, not only can we manage to change the appearance of the guitar, but this refinement will also result in a better-sounding instrument.

Tips for handling nitrocellulose for your guitar
- Finishing professionals spray warm or hot lacquer because cold lacquer splatters; which requires additional work to obtain a uniform finish. So always use warm or hot hairspray, never cold.
- Nitrocellulose is flammable and dangerous to inhale, so make sure you have a well-ventilated work area and use proper safety precautions, such as wearing a respirator mask.
Materials needed for DIY guitar refinishing project
This is the list of the necessary items and the quantities of the products that you need. We include StewMac part code numbers for easy identification. Of course you can use other equivalents that you have available in your city.
- Heat gun to remove existing finish.
- Putty knife code # 4464 and # 1287.
- Sandpaper in a variety of grits (see below) for prep, smoothing and polishing work on wood and paint finishes, code # 5562.
- Aerosol Lacquer Color: x 1: Blonde # 5884, TV Yellow # 5885, Sonic Blue # 5886, Aged Clear # 5887, etc.
- Aerosol Lacquer Gloss Clear x 3, code # 3881. You can also use Clear Satin, code # 3882.
- Polishing cloth x 2, code # 1815.
- Medium and fine liquid polishing cream, codes # 1845 and # 1846.
- Respirator mask, code # 5879.
Steps to refinish your guitar
- Disassemble the guitar
- Remove existing paint / finish
- Prepare the guitar
- Painted / sprayed
- Fine sanding and polishing
Disassemble the guitar
The first step is to completely disassemble the guitar or musical instrument that you want to paint. Thus, you must remove all hardware and electronics. It is important to be orderly throughout the process. To do this, keep all the pieces in one place when removing them. This will make it easier when assembling the guitar.
Strip / remove existing finish / paint
There are a few different ways to remove a finish. The easiest, cleanest and fastest way to remove a polyurethane or polyester finish is to use a heat gun and a flexible putty knife.

If you do not have experience it is always important that you start with the least critical places. So that in case of making a mistake it is not exposed. That is why we advise you to start at the back of the guitar.
Heat the existing polyurethane lacquer first, then lightly mark a starting point with a sharp putty knife without damaging the wood. The proper technique is to soften and lift the lacquer without burning it. To do this, it is important that you use the heat gun in the lowest position, and keep it moving to heat everything evenly. As you heat up the hairspray, it will start to rise, put the putty knife underneath and begin to remove it. You will see that once you manage to start lifting the finish, the process is fast. The critical thing here is not to damage the wood with the putty knife, or burn the paint with the heat gun. It is important that you remove all the lacquer, including that of the cavities.
Prepare the guitar body and neck
Review and correction of imperfections
The third step is to prepare the body and neck of the guitar for painting. This is a key step, since here we must put everything perfect so that the new finish is smooth and perfect. So inspect the body and neck of the guitar for dents, chips, or other imperfections in the wood.
Small dents can be removed with steam, by placing a damp cloth over the dent and applying heat with a soldering iron or the gun. In case it cannot be steamed due to its size, or because a piece of wood was torn off, it will be necessary to fill them. You can use glued sawdust or use filler paste. Once you have inspected the guitar and fixed all the imperfections, it is time to use the sandpaper and sanding blocks.

Sanding the wood
Using a flat backing pad and starting with 120-grit sandpaper, sand the entire body working only in the direction of the grain. Inspect the body or neck of the guitar and make sure you are removing any traces of original finish or sealer and that there are no blemishes in the wood.
After a complete sanding, clean the body with a damp cloth, making sure that no dust remains and that the grain of the wood is clearly visible. Allow to dry then sand with 220-grit sandpaper. Raise the grain again with a damp cloth, and sand a third time with 320-grit sandpaper. It is important to make sure the wood is completely smooth before going over. to the next grit of sandpaper. Keep in mind that sandpaper is getting finer, and larger imperfections should be removed with the coarsest grit sandpaper.
So after doing some painstaking work and making sure you get a nice, well-clean flat surface, you’re ready to apply the new nitrocellulose lacquer finish. From this point on, wear clean gloves to avoid contaminating the wood.
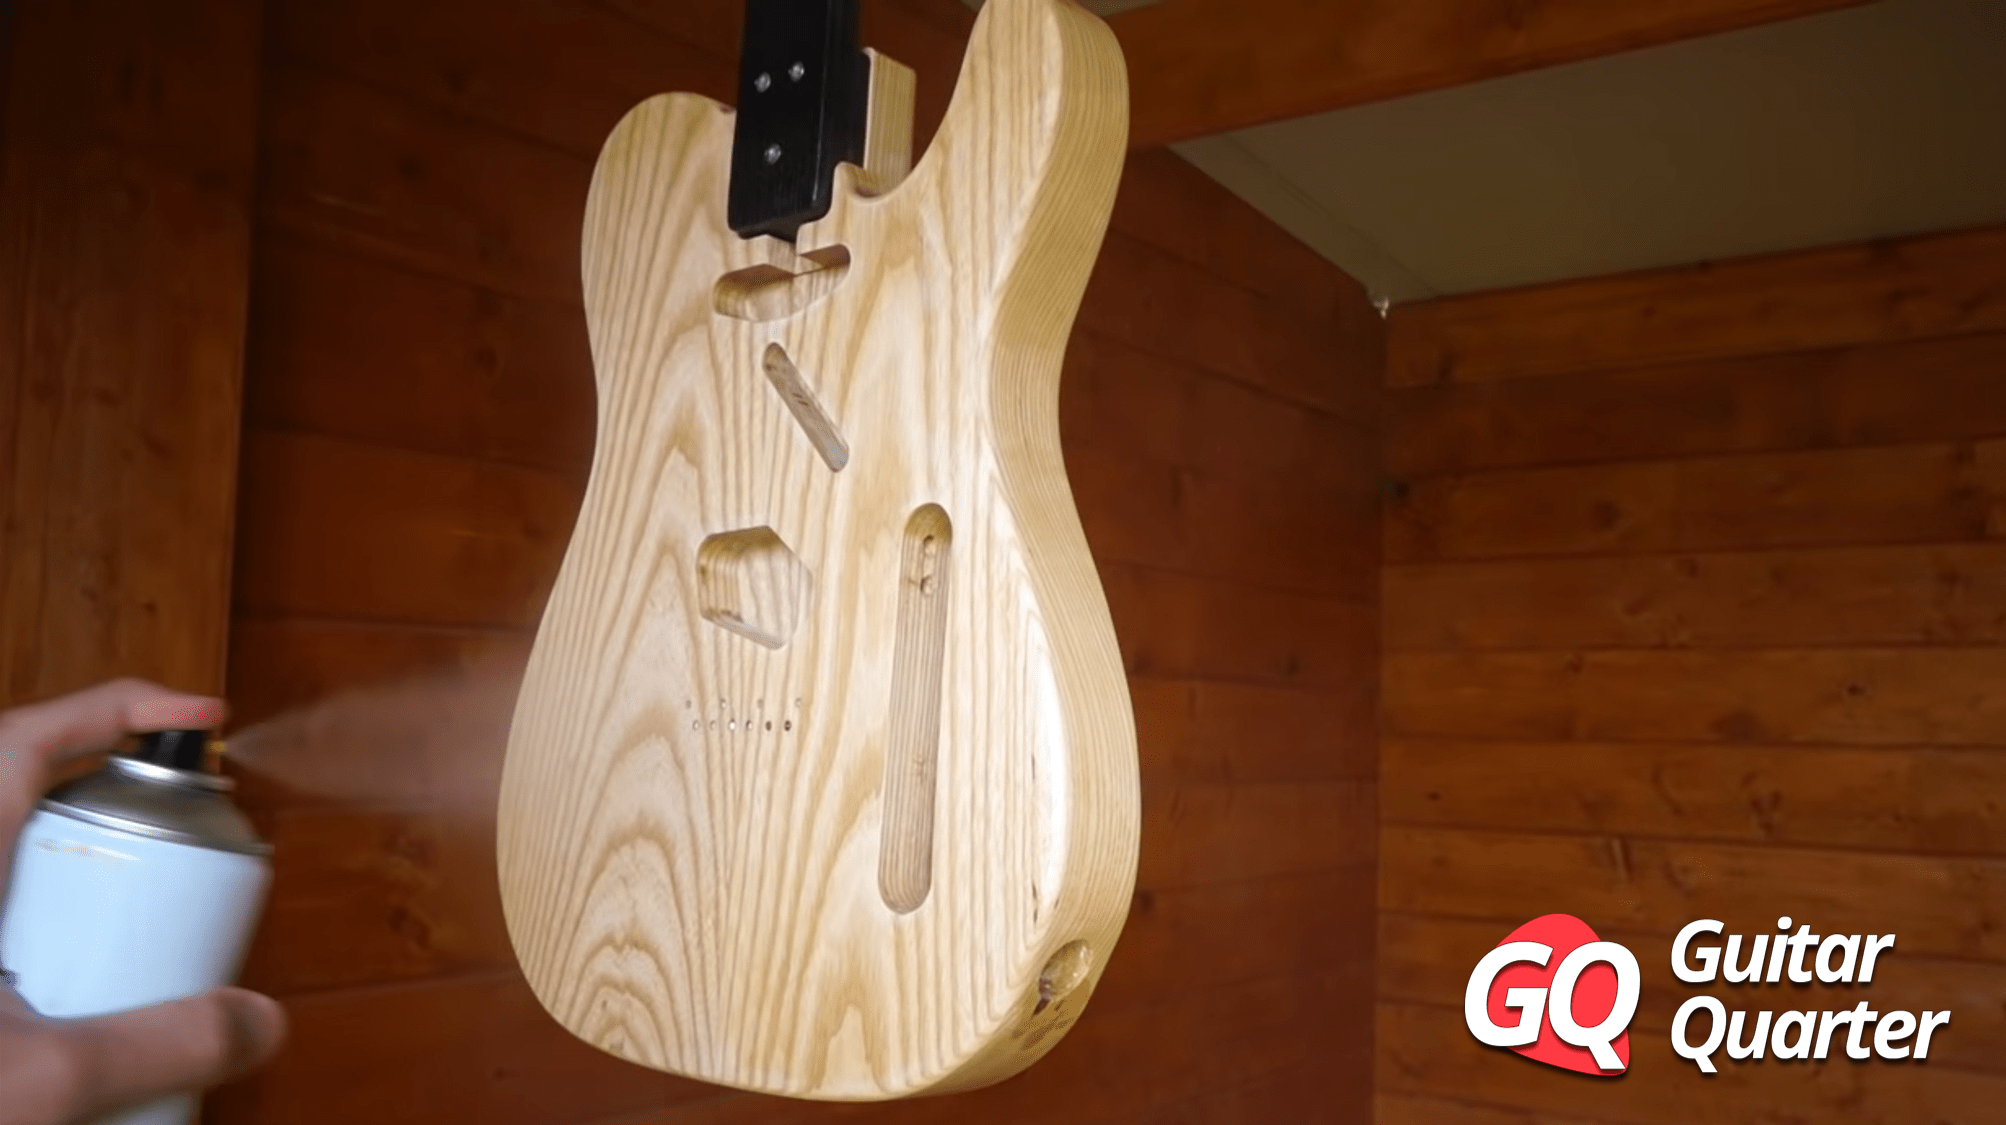
Spraying / Painting
To spray paint the finish, you will need some kind of holder to keep up your guitar and a place to hang it to dry and cure the nitrocellulose. Typically a piece of wood is used to support the body and handle while you spray them with the lacquer. They are also available in guitar holders from specialty houses like Stewmac. Below in the photo you can see that they are fastened taking advantage of the screw holes in the neckpocket of the body and the heel of the neck. These also allow you to hang the body and neck while the finish cures. It is important that for drying you use a place sheltered from the sun and earth, and that it is dry and warm.

This stage requires being very patient. A professional nitrocellulose finishing job takes weeks to complete, and requires a lot of detail, but it’s really worth it.
Day One: First 3 Coats of Colored Nitrocellulose Lacquer
Spray an initial light coat of colored hairspray, wait a few minutes, and then spray on a thicker wet coat. The starter coat gives the second thicker coat better adhesion and reduces the chance of running into the finish. Spray two or three wet coats, but not thick, runny coats, 90 minutes apart between coats, and allow to dry overnight.
Remember the advice to use the warm lacquer to paint the guitar, not cold. This will go a long way toward handling the hairspray and minimizing nitrocellulose stains and drops that will require a lot of post-correction and cleaning work.
Day Two : Even out the finish by sanding and spray 3 more coats of colored lacquer
Using a backing pad on the flat areas, lightly sand the body with 320-grit sandpaper to remove high spots from the lacquer and even out the entire finish. Don’t sand excessively for shine at this stage. Keep in mind that they are the first layers of lacquer, you only need the finish to be well even and remove imperfections.
Before sanding make sure the lacquer is not damp, if necessary because the weather was humid, wait another day.
After the finish is even and there are no stains or excess lacquer, clean all sanding residues well. Now you can re-spray three new even coats of color for full coverage, leaving 90 minutes between coats.

Day three : sanding and spraying 4 coats with clear lacquer
Repeat the process from day two, lightly sand the finish with 320 grit sandpaper being careful not to sand the layers of color and wipe off any residue. Remember that at this stage it is important to remove imperfections and lacquer stains and leave it well even.
Once the finish is matched, repaint, spray four even coats of lacquer, but this time you will use the clear on the guitar. Here you should leave an hour between layers. Let the guitar dry overnight.
Remember to make sure the lacquer is dry before sanding. If it is still wet, when sanding you can remove a lot of lacquer, generating a problem that is difficult to correct.
Day four : sanding and an additional 4 coats of clear paint
After confirming that the lacquer is not wet, lightly sand the finish with 320-grit sandpaper. Remove any imperfections and level the finish, then wipe off all residue. Just leave the finish even, don’t try to sand down the shiny spots just yet and be especially careful with the curves of the body; it’s easy to sand the edges too much and ruin the finish.
Repaint, spray four more coats of clear paint, every 90 minutes on the guitar. Now the instrument has eight top coats of clear lacquer. Let the finish dry overnight.
Day five : sanding and final 4 coats of clear paint
Re-sand the finish with 320-grit sandpaper. This time, most of the shiny spots will disappear, leaving an evenly dull appearance. Spray four more clear coats, 90 minutes apart, and allow to dry overnight. At this point the guitar will already have six layers of colored lacquer and twelve with transparent, totaling 18 layers of nitrocellulose lacquer.
Day six: Sanding and curing of the nitrocellulose lacquer
Like the days before, lightly scuff-sand the finish with 600-grit sandpaper to help the solvent escape. The body must now be left in a warm, dry place for two weeks for the finish to cure.
Fine sanding and buffing
Dry sanding

After the lacquer has cured, the next step is fine sanding. The first step is to dry sand the body with 800-grit sandpaper to a flat, dull surface. Clean debris from the paper frequently to make the sandpaper work better. At this stage you should remove the orange peel texture caused by shrinkage of the lacquer as the solvents heal from the finish. As always, be careful not to sand too much, the difference between a good fine finish and going over with the sandpaper and ruining everything is very small.
When all the small shiny low spots in the lacquer have been removed, you are ready to move on to the next step, which is wet sanding.
Wet sanding
Before you start, soak the microfinishing paper in water overnight before using it. It will scratch less and last longer. From now on, you should always keep it moist.
To bring the finish to a smooth, satin surface that is ready for final polishing, wet sand with 1200-grit micro-finishing paper and water. Excess water and residue should be removed from the finish with a clean, dry, soft cloth as you work. Frequently rinse the sandpaper in soapy water to remove tough residue that can scratch the finish.

Final polishing
Use soft cloths with polishing cream, start with the medium liquid polishing cream. Then, with a different cloth, repeat the polishing process with the fine liquid polishing cream. Buff fine scuffs and scratches from wet sanding to a final shine.
Important tip throughout the finishing process: It is important that you always complete the job well before proceeding to the next step. With polishing creams, it is the same as with sandpaper, each level of imperfection or scratches must be solved with the appropriate cream or sandpaper, and as the imperfections of each level are solved, the next must be done.

Once you have polished the body to a high-gloss shine, you just need to reassemble your guitar, not only will it look better, it will surely sound better too!
Related Notes: Stratocaster Saddles – Vintage and Block, Features and Differences, and How to Improve a Cheap Electric Guitar.